Thursday 29 December 2016

Plyometrics

Plyometrics

Speed and strength are integral components of fitness found in varying degrees in virtually all athletic movements. Simply put the combination of speed and strength is power. For many years, coaches and athletes have sought to improve power in order to enhance performance. Throughout this century and no doubt long before, jumping, bounding and hopping exercises have been used in various ways to enhance athletic performance. In recent years, this distinct method of training for power or explosiveness has been termed plyometrics. Plyometrics is based on the understanding that a concentric muscular contraction is much stronger if it immediately follows an eccentric contraction of the same muscle.

Plyometric Phases

A plyometric exercise comprises of three phases:
  • Eccentric phase, or landing phase, involves the pre-loading (energy is stored) of the agonist muscle group
  • Amortization phase, or transition phase, is the time between the concentric and eccentric phases. This time needs to be as short as possible otherwise the energy stored during the eccentric phase dissipates, reducing the plyometric effect
  • Concentric phase, or take-off phase, uses the stored energy to increase the force of the movement

Muscle Mechanism

The maximum force that a muscle can develop is attained during a rapid eccentric contraction. However, it should be realised that muscles seldom perform one type of contraction in isolation during athletic movements. When a concentric contraction occurs (muscle shortens) immediately following an eccentric contraction (muscle lengthens) then the force generated can be dramatically increased.
If a muscle is stretched, much of the energy required to stretch it is lost as heat, but some of this energy can be stored by the elastic components of the muscle. This stored energy is available to the muscle only during a subsequent contraction. It is important to realise that this energy boost is lost if the eccentric contraction is not followed immediately by a concentric contraction. To express this greater force the muscle must contract within the shortest time possible. This whole process is frequently called the stretch shortening cycle and is the underlying mechanism of plyometric training.

Choose the method to fit the sport

The golden rule of any conditioning program is specificity. This means that the movement you perform in training should match, as closely as possible, the movements encountered during competition. If you are rugby player, practicing for the line out or a volleyball player interested in increasing vertical jump height, then drop jumping or box jumping may be the right exercise. However if you are a javelin thrower aiming for a more explosive launch, then upper body plyometrics is far more appropriate.

The Klatt Tests

Before starting a programme of plyometrics it is worth conducting the Klatt tests with the athlete. The tests include the basic plyometric movements, so if they cannot be achieved it can be assumed the athlete is not ready for a programme of plyometrics.

Plyometric Exercises

The following are examples of lower body and upper body plyometric exercises.

Lower Body

Drop Jumping
This exercise involves the athlete dropping (not jumping) to the ground from a raised platform or box, and then immediately jumping up. The drop down gives the pre-stretch to the leg muscles (eccentric phase) and the vigorous drive upwards the secondary concentric contraction phase. The exercise will be more effective the shorter the time the feet are in contact with the ground. The loading in this exercise is governed by the height of the drop that should be in the region of 30 to 110 cm (Bompa et.al, 2005)[2]. Drop jumping is a relatively high impact form of plyometric training and would normally be introduced after the athlete had become accustomed to lower impact alternatives, such as two-footed jumping on the spot.
The two key factors in drop jumping are a minimal contact time with the ground and the height achieved in the drive upwards. Schmidtbleicher (1992)[3] says that a ground contact time of <0.25 seconds indicates a fast stretch-shortening cycle (SSC) and to adjust the drop height to achieve this contact time. If contact mats are not available to measure the contact time then observe the athlete's feet. On landing the athlete should stay on the balls of the feet (mid-foot). If the heels come into contact with the ground then the drop height needs to be reduced. Start at a drop height of 30cm and increment the drop height in 15cm steps.
The Reactive Strength Index (RSI) was devised to measure the interaction of the contact time and height jumped in order to monitor the development of explosive power. RSI is calculated by dividing the height jumped (metres) by the contact time (seconds).
Comyns (2012)[4] recommends the key coaching points for the drop jump are:
  • Minimise ground contact time - imagine the ground is a hot surface
  • Keep your legs stiff on landing
  • Minimise the flexion at the knee and hip on landing
  • Land on the mid-foot under your hips
  • Maximise the height you jump - jump as high as possible
Focus on: JUMP FAST, JUMP HIGH
Bounding and hurdling
If forward motion is more the name of your game, try some bounding. This is a form of plyometric training, where over sized strides are used in the running action and extra time spent in the air. Two-legged bounds reduce the impact to be endured, but to increase the intensity one legged bounding, or hopping, can be used. Bounding upstairs is a useful way to work on both the vertical and horizontal aspects of the running action. Multiple jumps over a series of obstacles like hurdles are valuable drills for athletes training for sprinting or jumping events.
Examples of lower body plyometric exercises with intensity level:
  • Standing based jumps performed on the spot (low intensity) - Tuck Jumps, Split Jumps
  • Jumps from standing (low-medium intensity) - Standing long jump, Standing hop, Standing jump for height
  • Multiple jumps from standing (medium intensity) - bounds, bunny hops, double footed jumps over low hurdle, double footed jumps up steps
  • Multiple jumps with run in (High intensity) - 11 stride run + 2 hops and a jump into sandpit, 2 stride run in + bounds
  • Depth jumping (high-very high intensity) - jumps down and up off box (40 to 100cm), bounding up hill
  • Eccentric drop and hold drills (high-very high intensity) - hop and hold, bound/hop/bound/hop over 30 metres (athletes stop and hold on each landing before springing into the next move), drop and hold from a height greater than one metre
Examples of lower body plyometric exercises are detailed on the Leg Plyometric page.

Upper Body

A variety of drills can be used to make the upper body more explosive:
Press ups & hand clap: Press-ups with a hand clap in between is a particularly vigorous way to condition the arms and chest. The pre-stretch takes place as the hands arrive back on the ground and the chest sinks, and this is followed quickly by the explosive upwards action. Once again, to get the best training effect keep the time in contact with the ground to a minimum.
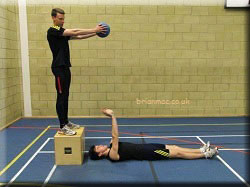
Medicine Ball: Another means of increasing upper body strength popular with throwers is to lie on the ground face up. A partner then drops a medicine ball down towards the chest of the athlete, who catches the ball (eccentric phase) and immediately throws it back (concentric phase).
This is another high-intensity exercise and should only be used after some basic conditioning.
Power Drop
Examples of upper body plyometric exercises are detailed on the Arm Plyometric page.

Planning a Plyometric Session

The choice of exercises within a session and their order should be planned. A session could:
  • begin with exercises that are fast, explosive and designed for developing elastic strength (low hurdle jumps; low drop jumps)
  • work through exercises that develop concentric strength (standing long jump; high hurdle jumps)
  • finish with training for eccentric strength (higher drop jumps)
An alternative session could be:
  • begin with low hurdle jumps
  • progress to bounding and hopping,
  • continue with steps or box work
  • finish with medicine ball work out for abdominals and upper body
Some examples and explanations of plyometric exercises for the arms and legs are detailed on the Leg Plyometric page and the Arm Plyometric page.

Plyometric drills and their intensity

Type of exerciseExamplesIntensity
Standing based jumps performed on the spotTuck Jumps
Split Jumps
Squat Jumps
Low
Forward jumps from standingBounds and hops over 10 to 20 metresLow to Medium
Multiple double leg hops from standing5 bounds
6 bunny hops
Double footed jumps over hurdles
Double footed jumps up steps
Medium
Multiple single leg jumps from standing startSingle leg hops up stadium stepsHigh
Drop jumps2 x 6 jumps for height or distanceHigh
Speed bounds4 x 20 metresHigh
Multiple jumps with run up3 x 2 hops and jump into sand pit with a 5 stride approach
2 x 10 bounds with a 5 stride approach
Very High

Warm up

A thorough warm up is essential prior to plyometric training. Attention should be given to jogging, stretching (dynamic), striding and general mobility especially about the joints involved in the planned plyometric session. A cool down should follow each session.

How many?

It is wise not to perform too many repetitions in any one session and since it is a quality session, with the emphasis on speed rather than endurance, split the work into sets with ample recovery in between. An experienced athlete conducting lower body plyometrics may conduct up to 150-200 contacts in a session - athletes new to plyometric work should start with low to medium intensity exercise with around 40 contacts per session e.g. 2 sets of 6 bunny hops is 12 contacts. Similar approach should be taken with upper body plyometrics.
The focus must always be on quality and not quantity.

Recovery

Allow at least one minute of rest between each exercise repetition so as to allow the neuromuscular system to recover. Allow three days between plyometrics sessions when planning.

Where to do it and what to wear

For bounding exercises use surfaces such as grass or resilient surfaces. Avoid cement floors because there is no cushioning. Choose well-cushioned shoes that are stable and can absorb some of the inevitable impact. All athletes should undergo general orthopaedic screening before engaging in plyometric training. Particular attention should be given to structural or postural problems that are likely to predispose the athlete to injury.

Conditioning for plyometrics

Higher than normal forces are put on the musculo-skeletal system during plyometric exercises so it is important for the athlete to have a good sound base of general strength and endurance. Most experts state that a thorough grounding in weight training is essential before you start plyometrics. It has been suggested that an athlete be able to squat twice their body weight before attempting depth jumps. However, less intensive plyometric exercises can be incorporated into general circuit and weight training during the early stages of training to progressively condition the athlete. Simple plyometric drills such as skipping, hopping and bounding should be introduced first. More demanding exercises such as flying start single-leg hops and depth jumps should be limited to thoroughly conditioned athletes.
Conditioning programs to develop leg strength are detailed on the Lower Leg Conditioning page and the Leg Conditioning page.

Young athletes

Some authors suggest that moderate jumps (low intensity) can be included in the athletic training of very young children (Lohman, 1989)[1]. However, great care needs to be exerted when prescribing any training procedures for preadolescent children. Because of the relatively immature bone structure in preadolescent and adolescent children the very great forces exerted during intensive depth jumps (high intensity) should be avoided (Smith, 1975).

Summary

Plyometric type exercises have been used successfully by many athletes as a method of training to enhance power. In order to realise the potential benefits of plyometric training the stretch-shortening cycle (SSC) must be invoked. This requires careful attention to the technique used during the drill or exercise. The rate of stretch rather than the magnitude of stretch is of primary importance in plyometric training. In addition, the coupling time or ground contact time must be as short as possible. The challenge to you as coach or athlete is to select or create an exercise that is specific to the event and involves the correct muscular action. As long as you remember specificity and to ensure there is a pre-stretch first then the only limit is your imagination.
Plyometric exercise and weight training can be combined in complex training sessions to develop explosive power.


References

  1. LOHMAN, T.G. (1989): Assessment of body composition in children. Pediatr. Exerc. Sci. 1, p. 19�30.
  2. BOMPA, T. et al. (2005) Periodisation Training for Sports. 2nd ed. USA: Human Kinetics
  3. SCHMIDTBLEICHER, D. (1992) Training for power event. In: Komi PV (ed) Strength and power in sport. Blackwell Scientific, London, pp 381-395
  4. COMYNS, T. (2012) Exploding into action, Athletics Weekly, December 6 2012, p. 58-59www.brianmac.co.uk/plymo.htm

Wednesday 28 December 2016

Get a Fighters Abs

4 exercises to get a fighters six pack

4 Exercises to Get a Fighter’s Six Pack

As a kid growing up, I would sit in front of a TV all alone in the basement watching old Bruce Lee movies.
His speed, power, athleticism and ripped physique fascinated me to no end. I needed to know how someone could be capable of all this and be as shredded as Bruce Lee was.
Because of this obsession, I was drawn to various styles of martial arts, but boxing was the first thing to catch my eye. After watching Mike Tyson knock out everyone who dared to stand in front of him, the sport had my attention. That wasn’t the only thing that grabbed me, though – he was completely ripped too.
As I started to watch boxing, I noticed that every fighter had an incredibly ripped physique.
If you compare body images with athletes in various sports, we can all agree that  fighters and boxers lead the pack with some of the most desired physiques in sports.
They’re strong, lean, athletic and always shredded. If you have ever seen a fight on TV before, you know what I mean.
Arguably one of the most impressive aspects of the fighter’s image is his midsection. Almost every fighter I saw on TV had chiseled abs that would make any fitness model jealous.
Fighters are also known for having a tremendous amount of core strength.
Have you ever wondered how fighters train their abs?
I know I wanted to know. Hundreds of sit-ups and crunches every day had gotten me nowhere. Even hour long runs every day showed little change.
During this time, I felt like I was getting weaker. I was far from strong and my abs looked like jello even though I had a low body fat percentage.
After months of not seeing the results I wanted, I decided to join a boxing gym. I figured if I wanted to look like a fighter, I should train like one.
On my first day there, I was actually a little disappointed. I did a “boxercise class” that consisted of a bunch of jumping jacks and other cardio exercises.
I was ready to get out of there until I noticed what the actual fighters were doing. Their training was completely different. They trained for performance. It wasn’t surprising to see that these fighters were very fit.
Aesthetics came as a result of their workouts even though it wasn’t the priority. One thing I found remarkable was the type of ab training fighters go through.
Trust me when I tell you this: they don’t train their abs like everyone else.
As a fighter, you receive constant blows to your midsection. You’d better believe you have to train your abdominals differently than everyone else.
Fighters also have to produce large amounts of power in their strikes, and core strength is the central source of this power and athleticism. Try relaxing your abdominals while throwing a punch as hard as you can. Not that impressive, is it?
Without a strong core, fighters cannot do what they do.
Today I am going to give you a glimpse of how top-level fighters train their abs and provide you with a sample ab-training workout.
Before I get into the workout, I am going to reveal three very common mistakes most likely make when it comes to ab training. These three mistakes prevent you from having the Bulletproof Abs you deserve.

Common Ab Training Mistakes

Mistake #1: Too Much Volume

Way too many people perform countless reps of pretty much any type of ab exercise out there.
Instead, we should focus on the strength aspect of core training. By now we should all know that crunches and sit-ups are a complete waste of time, so I won’t beat that dead horse.
The thing is people still do 400-500 reps of an ab exercise. Your abdominals and core should be treated like any other muscle group.
For some weird reason, many people perform more reps when training their core compared to other muscle groups. Strength should also be considered when training your core. You don’t strength train by doing 500 reps of one exercise.
Here’s something else considered “too much volume for core training.” Holding a plank longer than a minute. If you can already hold a plank for a minute or even 30 seconds (assuming you have great form), then it’s time to move on.
There are much more challenging variations you can do to effectively train your abdominals and core. I’m going to show you a plank variation where you will learn to brace your abs like a fighter about to throw a punch.
This leads me to the next mistake.

Mistake #2: Drawing In Instead Of Bracing Your Abs

Here’s what I mean by that: too many people suck in their stomach instead of pushing it out, which is also known as bracing.
Strength comes from bracing your abs, not sucking in your gut. Try pushing a heavy object as hard as you can while sucking in your gut. Now, push that same object while you push your stomach out and brace your abs. You will notice a huge difference.
Drawing in and bracing your abs is the difference between having abs and having abs that really pop. Fighters rely heavily on the brace, and they would not get the same type of power in their strikes if they didn’t brace their abdominals.
One way you can learn to brace your abs is to pretend you are getting hit in the stomach. What’s your initial reaction? You will naturally brace your abs to withstand the blow.
In the workouts I outline later, you will learn specific exercises that force you to brace your abs.

Mistake #3: Neglecting Other Muscles In Your Core

Let’s face it. No one likes love handles. It doesn’t look good, it doesn’t feel good, and everyone hates them – even men.
But don’t aim to do one exercise for each muscle group of the core. Instead, we have to focus on exercises that work the core as a whole, if we ever want to develop a rock hard midsection.
How do we do this?
By focusing on stability exercises that prevent movement rather than create it. This way, you have many more muscle groups in your core working to stabilize yourself. This also helps prevent an injury to your lower back.
The last thing you want to do is create mobility in your low back. This is how you commonly injure the lower back region by performing exercises that flex, extend, and laterally flex the spine. Instead, we should focus on stabilization.
You can’t get Bulletproof Abs if you’re injured, so let’s make sure it doesn’t happen.

The Bulletproof Ab Workout

Now that we know the three common mistakes you should never make, it’s time to figure out what we should be doing. Here’s a clue: it involves focusing on lower reps, concentrating on bracing the abs, and working the core as a whole.
In the sample ab workout below, we focus on all three of these aspects. The best part is that you won’t need one piece of equipment. You can literally do this in the comfort of your own living room.
So without further delay, here is your Bulletproof Ab Workout:

The Bulletproof Ab Circuit

Hardstyle Plank – 10 Sec x3
Long Plank Walkouts – 5 Reps
Long Plank Armpit Touches – 5 Reps Each Side
Box Plank – 10 Reps Each Side
Rest 60 Sec
Repeat for a total of 3-4 rounds.
If it’s your first time doing this circuit, start with three rounds and work your way up to four.
Now you’re probably wondering what these exercises look like. Check out the descriptions of each exercise below.

Hardstyle Plank

  • Start in a plank position on your elbows.
  • Make sure there is a straight line from your head to toes.
  • Keep your hands away from each other.
  • Squeeze your abs, glutes, quads, and fists as hard as you can.
  • Drive your elbows to your toes as hard as you can.
  • Hold this tension for 10 seconds and then rest for 5 seconds.
  • Repeat this two more times.
Hardstyle Plank

Long Plank Walkouts

  • Get into the top of a push up position.
  • Walk your hands forward until they are above your head while keeping your abs braced.
  • Walk your hands back into the top of a push up position.
  • Prevent the hips from swaying side to side when performing the movement.
Long Plank Walkouts

Long Plank With Armpit Touch

  • Get into the top of a push up position.
  • Walk your hands forward until they are above your head.
  • Keeping the abs braced, touch the opposite armpit.
  • Repeat the movement, alternating sides for the prescribed reps/time.
  • Prevent the hips from swaying side to side when performing the movement.
Long Plank With Armpit Touch

Box Plank

  • Start in a quadruped position. Knees underneath the hips and hands underneath the shoulders.
  • Brace your abs and get your knees off the ground.
  • Keep the abs braced and without moving the hips, get one hand off the ground.
  • Repeat with the other hand.
Box Plank

Wrap Up

There you have it, a core routine that will have your abs working harder than they ever have before. You can add this circuit to the end of a training session or even on an off day. You can also do this circuit anywhere since you don’t need any equipment.
Performing exercises like these will take you much farther than just getting the standard six pack. Training your core for strength like this will help improve your overall athleticism. This type of ab training also helps supplement any type of lifting you may do.
Remember, the core is the foundation for everything else. If you’re going to overhead press a large amount of weight, a weak midsection cannot support your structure. You will either injure your lower back or not complete the lift.
Same thing goes for a fighter trying to develop more power into his/her strikes. Without a strong midsection, the fighter cannot transfer the power from his/her hips into the end of the punch.
The kinetic chain is useless without a strong core to support it. Perform these exercises on a regular basis and you’ll have Bulletproof Abs in no time.

About the Author


Andrew RaposoAndrew Raposo is a North American Super Middle Weight Muay Thai Champion and a Two Time Provincial Gold Medalist in Boxing. Andrew is a passionate Fitness & Strength Coach and runs a private practice out of Toronto, Canada. Where he trains high-level fighters for competition as well as transform average bodies into extraordinary results with his unique approach to training. He is also the Creator and Author of www.FighterAbs.com.

References

McGill, S. “Low Back Disorders.” Human Kinetics, 2002.

Hindu Squats

The history behind the Hindu Squat originates from ancient India and was an exercise that Indian wrestlers used to build incredible leg strength. Ghulum Mohammed, one of the most famous wrestlers routinely performed 500 Hindu Squats each day to maintain his peak condition.

How to do a Hindu Squat:

In order to properly perform a Hindu Squat, start with your feet about shoulder width apart. Squat down until your buttocks touch or almost touch the backs of your legs. While your lower body is lowering, your hands will rise up. When you get as low as you can lightly graze the floor with your hands. As you come back up focus on your glutes (butt) driving your body back up. Think of it as your source of power for this exercise. Repeat.

OTHER GREAT SOA ARTICLES:


Muscle group worked:

Glutes and Thighs
Target Repetitions for Muscle Growth: For the Hindu Squat even a large number of reps will still cause muscle gain. Shoot for at least 25-30 straight for intermediate. Beginners try for 10-15.

Why Hindu Squats work:

The Hindu Squat works so well because they are done relatively quickly. This quick squat is used to engage all of the leg muscles, not isolate specifically the quads or hamstrings.

Tips:

Try your best to not have your knees go over your toes. It will be difficult but this improves form and prevents knee injury.

Important!:

Breath slow and steady as you perform the Hindu Squat
Disclaimer: Talk to your primary care physician before beginning any exercise regimen.

Beetroot for Cardio Fitness

(NaturalNews) Beetroots, also known as beets, are packed with blood pressure-reducing, heart disease-preventing nutrients that help maintain healthy active function and boost overall endurance levels in those that consume them. And a new study out of the University of Exeter (UofE) has found that not only do beets benefit athletes by boosting their performance, but they also help the elderly and people with heart or lung diseases to live more active, physically-functional lives.

Published in the Journal of Applied Physiology, the study builds upon a previous one conducted by the university that found that beet juice increases exercise capacity by 16 percent in athletes that drink it. Except this time, these same benefits were found to apply to non-athletes as well, including those that have trouble performing everyday physical activities.

"As you get older, or if you have conditions which affect your cardiovascular system, the amount of oxygen you can take in to use during exercise drops considerably," explained Katie Lansley, a Ph.D. student from the Sport and Health Sciences department at UofE, and author of the study. "What we've seen in this study is that beetroot juice can actually reduce the amount of oxygen you need to perform even low-intensity exercise."

Beet juice not only dilates blood vessels to improve blood flow and lower blood pressure, but it also reduces the amount of oxygen muscles need during physical activity. This muscle effect makes it significantly easier for people of all ages, no matter what their health condition, to perform both low- and high-intensity physical activities. In fact, researchers noted that those who drank beet juice required 12 percent less effort to walk than those who did not drink it.

Based on a comparison between whole beet juice and beet juice that had its nitrates filtered out, the team was able to conclude that the natural nitrates are the primary active ingredient in beet juice that bring about improved overall performance and heart function.

Sources for this story include:

http://www.eurekalert.org/pub_releases/2010-

Learn more: http://www.naturalnews.com/030777_beet_juice_cardiovascular_health.html#ixzz4UAKgpYO6www.naturalnews.com/030777_beet_juice_cardiovascular_health

Friday 9 December 2016

Todays Training

A nice relaxed training session to finish the week off.
Two hours of internal martial arts .
Perfect .

Thursday 8 December 2016

7 Wing Chun Health Benefits

                         
                           www.wingchunlife.com/wing-chun-health.html
                                                 

                          Wing Chun Health Benefits


In Wing Chun, health is important (even though, you probably study it to learn how to take away someone else’s health). There are at least seven areas where Wing Chun has a positive affect on your mental, emotional or physical well being.
What’s more, results from a study in the International Journal of Sports Medicinesuggests that Wing Chun offers a more robust cardio workout than Tai Chi. And a study in the British Journal of Sports Medicine found that a group of middle aged martial artists (40 - 60 year olds) had more muscle endurance and strength, and less body fat than the control group matched for the same age and sex!
These studies are great for geeky scientists in laboratories… but how about in real life for people like you and me?

1. Fitness: At my school one student quit smoking, another lost almost 100 pounds (45 kilos) in the year he trained with us, and I lost weight and lowered my blood pressure by practicing Wing Chun.
Naturally, the level of fitness you achieve depends on your motivation and goals. The student who lost almost 100 pounds (45 kilos) worked out after kung fu class and watched his diet carefully. All of this added together with Wing Chun led to his amazing results.
When asked about our transformation, each one of us admit that it's thanks to Wing Chun that we decided to take action and make positive changes to our health.

2. Better Coordination: One of the great things about Wing Chun is that we train both sides of our bodies (the left and right sides). Better still is the fact that Wing Chun, and kung fu in general, trains you to use fine motor skill to fight (this is especially true at the advanced Wing Chun stages). For example, it takes a lot of coordination to attack using a finger jab or simultaneously block, strike and kick at the same time.


3. Builds Internal Energy and Wellness: Most people have heard how Tai Chi and its slow forms are good for your health and helps develop internal “Qi” power. There are dozens of medical studies that support this.
Well, if you do your Wing Chun forms slowly and deliberately, like Tai Chi forms, you’ll get many of the same benefits. I get a similar workout doing my Wing Chun forms, slowly, as I do when I practice Tai Chi. What’s nice about using Wing Chun forms is you can workout in a small area, like a corner of your bedroom or hotel room if you’re traveling.
In addition some Wing Chun schools teach basic Chinese medicine to the very advanced or “Provisional Sifus”. This way they have some ability to help heal minor injuries and ailments. See how to use Dit Da Jow to heal bruises.

4. Relieves Stress: Getting a good workout, especially a cardio workout helps purge the stress. And it’s good for the heart too. Plus, training Wing Chun forces you to focus on the here and now, not on your problems.
For instance, if someone is throwing a kick or punch at you, you don’t have time to worry about the parking ticket you just got or the pile of paper work sitting on your desk at work.
Getting rid of stress has really helped me clear my mind and allows me to do better work in my job.
And I’m not alone… the Oscar-nominated actor Robert Downy Jr. credits Wing Chun to helping him relaunch his career, break his drug habit and get his life back together.

5. Better Reflexes: In Wing Chun we train both contact (chi sau) reflexes and visual reflexes. This training also improves our muscle memory. Which is when your body makes the right moves on it’s own. It’s almost like Spider-Man’s spider-sense.
I’ve had many experiences where I’ve caught something falling off a table or counter, in mid-fall, without even thinking about it. And on more than one occasion I’ve ducked my head just before smacking it on a low hanging ledge or shelf, you know, one of those low ledges that everyone else walks into. My body just “knew” it was there and “knew” what to do.

6. Improves eye focusing: When you’re not in contact range you have to rely on visual reflexes (your eyes) to keep you safe and a threat to your opponent.
In the West we pay little attention to eye health. In Chinese schools, on the other hand, exercising the eyes during school is part of the daily routine. In my kwoon we exercise the eyes during our warm up.
I’ve noticed that the eye exercises are beneficial to me especially since I work on a computer most of the day.

7. Improves speed and power: Wing Chun is well known for its speed. And when you train correctly you learn to back up the speed with explosive power.
This is good for your overall health because you want to have ”reserves” available in an instant.
In other words, you don’t want to be so well tuned that you’re always cruising around at maximum efficiency. Think of it like your car.
You’re cruising down the highway when a car crash happens next to you. In a case like this you need to hit the gas pedal and jump out of harm’s way. If your car doesn’t have “spare capacity”, or extra power in reserve, you’re going to sit there and get crushed.

Your health works in the same way. You need extra capacity to deal with physical, emotional or mental shocks. There are too many stories where someone suffered a heart attack because of emotional or mental distress, not a physical one.

Wednesday 7 December 2016

The view from today's run


Amazing run

Today was a great 10k run.
A beautiful sunny winters day.How amazing to live in a part of Britain where I can run along a beach with palm trees looking out at a 4th century castle in the bay.
Time now  for a delicious and  nutritious evening meal.Then  another session of wing chun kung fu which I love . So important to train the mind as well as the body.

The Top 5 Tractor Tire Exercises: Flipping & Beyond

The Top 5 Tractor Tire Exercises: Flipping & Beyond


In my younger days, I remember sitting in front of the television mesmerized by athletes competing in The World’s Strongest Man, wondering how they pulled off such amazing feats of strength that mere mortals could only dream of.
I fantasized about being just like them and possessing the ability to make the impossible seem easy. Thousand pound squats, keg tosses, diesel truck pulls, heavy farmer walks, and of course the old strongman staple: The Tire Flip.
Even through all of my training programs over the years, I have never amassed the hulking physique and Herculean strength to compete at that level, but thankfully, strongman training is not solely reserved for the uber-athletes on television.
In recent years, the popularity of using strongman training (especially large tires), has exploded with many coaches and athletes incorporating the various exercises into their programming.
When performing the various tire movements correctly, they can enhance the strength, power development, and conditioning of anyone willing to challenge themselves like their Strong Man idols.
The one nice advantage about using tires to train is that you only need to be concerned about storage space because they are an inexpensive piece of equipment to obtain. I have three tires at my gym and none of them cost me more than some beer money.
To find a tire, do a local search for shops that deal with commercial vehicles. For one of my tires I had to leave my contact information and they called me when they had one in.
Usually, tire shops are more than willing to part with these large tires because it costs money to recycle them; it’s a win-win situation for you and them.
Once you have your tire, it’s time to start using it, and there are a variety of exercises that will challenge you in ways traditional weight training can’t. With proper technique, your functional strength can reach a level much higher than before.

The Farmer Walk

Farmers Walk Using A Tire
The tire farmer walk is a challenging variation that taxes your conditioning and grip. Simply set up in a deadlift position and lift the tire, then take it for a walk. Make sure you keep your chest up and shoulders back for safety.

Tire Deadlift

Performing a Deadlift with a Tire
Tires can be used as variations for conventional exercises like the deadlift. We all know of the benefits the deadlift has for hip strength and power production that is necessary for many sporting movements.
The tire deadlift adds a unique grip training dynamic because you have to rotate your hands so that your thumbs are facing back to grip the tire.
Before you attempt the deadlift, it is very important that you lock your shoulders down and back to maintain their stability and safety, and then simply drive with your legs and extend your hips until you are in the standing position (much like a barbell deadlift).

Tire Flip

A Tire Flip
This is the classic movement that The World’s Strongest Man made famous. The flip is a tremendous movement for people who need explosive power. This is one of the best exercises for athletes such as football linemen, wrestlers, and others who need to exert force quickly to move heavy opponents.
The flip looks simple enough, right? You just lift the tire up and flip it over. Essentially, that is the idea and with a light tire it may not matter how strict your technique is, but if you want to lift a relatively heavy tire without proper technique, you might be setting yourself up for a potential injury.
The first concept to consider is the fact that the tire flip is not a deadlift; it is more like a hack squat. The movement is generated solely from the lower body, the arms merely lock onto the tire. Do not attempt to lift the tire with your arms or serious injury can occur.
To set up properly you want your arms slightly bent and in a comfortable position. Your feet should be back away from the tire and your chest up against it. Your back is flat and your hips are low. Lockdown your upper body and drive from your legs to extend your hips, knees, and ankles.
When you do this your hips should be propelling the tire simultaneously upward and forward. Your body should remain close to the tire at all times as you quickly rotate your hands and follow through until it is completely flipped.
Some tires are heavy and you may only be able to lift it waist high; at this point, drive one of your knees against the tire to prop it up until you can get your hands turned and your hips adjusted to complete the flip.
You can train tire flips in two ways: you can flip a heavy tire for strength and power production or go with a lighter tire to work more volume and train your endurance and conditioning.

Sledgehammers

Sledgehammer Slams On A Tire
I do not know of a single person who does not enjoy beating a tire with a sledgehammer. Much like the tire flip, this exercise is great for power production, however, sledgehammer work focuses on power production in the opposite direction.
Instead of extending the hips and propelling the tire upward, you drop your hips to swing the hammer into the tire. Sports like wrestling, judo, and rotational sports (baseball, volleyball, golf, etc.) can benefit tremendously from sledgehammer training.
Like the tire flip, the movement might seem simple enough, but understanding a few important technical components will make sledgehammer work safer and much more effective. Line up the head of the hammer on the middle of the tire in front of you.
Have your feet lined up about shoulder width apart. One hand should be on the top of the handle and one near the bottom. Rotate the hammer until it gets aligned directly over your head.
With the hammer overhead, it should feel weightless, this is where you begin to simultaneously drop your hips downward as your top hand slides toward the bottom so maximum power can be generated. Catch the hammer up high on the rebound and then repeat the motion.
When you get the hang of it, alternate sides.

Partner Work

Partner Work Using A Tire
Tires can be great for team building and there are a few movements where two people can work together to get the job done. At my gym there is one tire that is so heavy that only one person has successfully flipped it by himself.
To manipulate this monster weight, we do partner flips. Each person sets up close to the other and away they flip. Timing and teamwork is necessary for this exercise to be successful.
Quite possibly one of my favorite drills is the partner tire push. This has a practical sporting application for anyone needing to absorb force and generate power from their legs and project it through their upper body, especially in a pushing motion like a lineman in football.
Put one person on either side of a large tire with a staggered stance. One person will keep their elbows tucked, drive with their legs, and shove the tire towards the other person.
The other person will tuck their arms close to the side of their body and absorb the energy with their core and legs muscles, then redirect the tire back to their partner.

Sample Tractor Tire Workouts

Tire training offers a unique and unparalleled experience that should be considered in most strength and conditioning programs where power generation is a necessity.
Adding some of these tire training exercises into a carefully structured strength and conditioning program will enhance strength, coordination and increase power production. Now go out and find a tire and make it happen.

Tire Flip And Farmer Walk Circuit

This circuit consists of three rounds of two tire movements; simply flip the tire a desired distance and then jump inside, deadlift the tire and farmer walk it back to the start. Try to complete three rounds in a row or rest if you want to fully recover.
I also like using partners for this circuit. One person completes a round and then it’s on to the next person. If you have enough athletes at one time, make some teams and time them and see who completes the challenge the fastest.

2 Minute Tire Flip Challenge

One of the records on the board in my gym is the Two Minute Tire Flip. We use the small tire (approximately 250lbs.) and flip it as many times as we can in two minutes.
By the end of the challenge your hamstrings should be screaming and you should have some burning lungs to go with it. If you can get into the high 40s for repetitions you are doing quite well. Take the challenge and see where you stand.

Tire Flip And Sledgehammer Circuit

Much like the circuit above, start by flipping the tire for a desired distance and then when you get to the end grab the hammer and hit the tire for 15 strikes on each side. Rest and repeat the circuit two more times.

Sledgehammer Circuit

My favorite sledgehammer circuit consists of 30 seconds of work and 15 seconds of rest. You are going to work on one side, rest, and then perform the strikes on the opposite side. For an added challenge add a third round where you alternate strikes on each side.
Rest about 60 seconds after each group of two or three and complete the whole circuit three times.

The Top 5 Tractor Tire Exercises: Flipping & Beyond